![]()
Rig Interface Help
Aide de l’interface de rig
Voici les informations essentielles dont vous aurez besoin pour connecter votre interface de plate-forme et de faire fonctionner avec AC Log et mon logiciel de
concours.
Pour commencer avec l’interface de rig, vous aurez besoin du matériel d’interface nécessaire pour connecter votre rig à votre PC. De nombreuses plates-formes modernes se connectent désormais directement à votre PC
avec un simple câble USB. Consultez la section Contrôle CAT du manuel de votre radio pour plus de détails.
Voici une vidéo que la jeune Faith Hannah, AE4FH a montée, montrant comment interfacer un Icom 7300 avec mon logiciel :
Pour interfacer votre plate-forme avec mon logiciel, une fois que vous avez le matériel nécessaire connecté entre votre radio et votre PC, configurez le formulaire d’interface de la plate-forme comme suit:
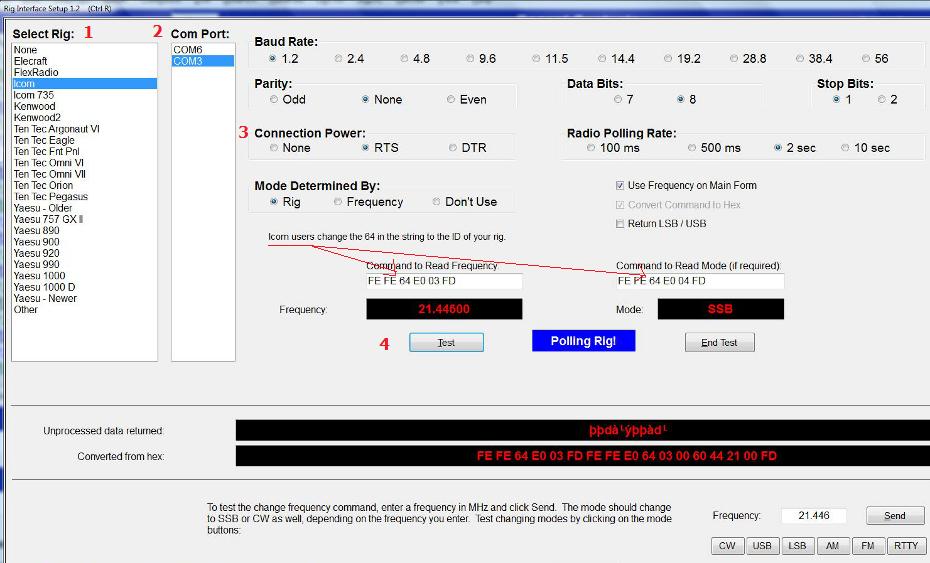
1. Pour Sélectionnez Rig, sélectionnez le rig avec lequel vous interfacez Pour la plupart des plates-formes, il suffit de sélectionner la bonne plate-forme pour régler avec précision votre
vitesse de transmission, parité, bits de données, bits d’arrêt et chaîne d’interrogation!
Utilisateurs Icom uniquement ! Si vous sélectionnez Icom, vous verrez également du texte apparaître, vous demandant de changer l’ID du rig (64 par défaut, ce qui se trouve être pour le 756 Pro II)
à l’ID de votre plate-forme (les lignes rouges dans le graphique ci-dessus). Vous devriez être en mesure de trouver votre ID de plate-forme dans la section de contrôle CAT de votre manuel. S’il y a un petit h, comme 64h,
ignorez-le et entrez simplement le numéro à deux chiffres. J’ai également inclus tous les paramètres réussis que j’ai reçus d’autres utilisateurs ci-dessous, qui incluent l’ID du rig.
2. Pour Port Com, sélectionnez le port com auquel votre plate-forme est connectée. Même si un seul port est répertorié, vous devez toujours cliquer sur
le port pour le sélectionner.
3. Pour Connection Power, sélectionnez l’option d’alimentation, le cas échéant, requise par votre interface. La plupart utilisent RTS, certains utilisent DTR et d’autres pas
nécessitent une option d’alimentation du tout.
Ready to Go!
Si vous avez correctement saisi vos paramètres, vous devriez être prêt à activer l’interface. Pour essayer …
4. cliqué Sur Test pour commencer à interroger votre plate-forme. Si la fréquence et le mode apparaissent à la fois, vous êtes prêt! Le logiciel suivra votre
fréquence, (et bande à condition que vous soyez dans les limites d’une bande amateur) et mode. De plus, lorsque vous cliquez sur un spot DX depuis le formulaire principal, votre plate-forme s’accordera directement à cela
la fréquence!
En cas de difficulté – Ne paniquez pas!
Si, pour une raison quelconque, vous n’obtenez pas de réponse de votre plate-forme, il existe un certain nombre de causes possibles:
Tout d’abord, assurez-vous que votre plate-forme est allumée et que le matériel d’interface de votre plate-forme est correctement connecté à la fois à votre radio ET à votre PC.
Assurez-vous que vous avez sélectionné le bon port Com.
Assurez-vous que vous avez sélectionné la puissance de connexion appropriée pour votre interface.
Dans certains cas, certaines plates-formes utilisent des paramètres autres que les paramètres par défaut. Jetez un œil à tous les paramètres réussis suivants envoyés par d’autres utilisateurs ci-dessous et corrigez vos paramètres si nécessaire.
réussi Rig Settings!
Ce qui suit sont des paramètres fonctionnels et réussis que les autres utilisateurs ont eu la gentillesse d’envoyer. Notez que l’option Port Com et alimentation dépendra de votre PC et de votre interface, donc
ces deux paramètres peuvent être différents des paramètres répertoriés ci-dessous.
Si vous essayez ces paramètres pour votre plate-forme sans succès, quelque chose de spécifique à la plate-forme ou au matériel d’interface est probablement en jeu. Puisque je n’ai qu’un Kenwood TS 440s un Icom 756 Pro II
et Icom 7610 ici, je ne serai pas en mesure de fournir une assistance supplémentaire pour toute autre plate-forme ou interface. Si vous ne parvenez pas à démarrer votre plate-forme après avoir essayé les paramètres ci-dessous, veuillez
n’hésitez pas à rechercher les archives des messages sur le
Users group ou postez une question là-bas. Il est probable que quelqu’un avec une plate-forme et une interface similaires puisse vous aider.
If you have settings for a rig not listed below, I would be very grateful if you would send them along, by clicking the Copy Data to Clipboard button while polling your rig and pasting the contents into an e-mail!
Elecraft K2
Rig Name = Elecraft
Read Frequency Command = FA;
Read Mode Command = MD;
Convert To Hex = False
Baud Rate = 4800
Parity = None
Stop Bits = 2
Data Bits = 8
Power Option = RTS
Elecraft K3
Rig Name = Elecraft
Read Frequency Command = FA;
Read Mode Command = MD;
Convert To Hex = False
Baud Rate = 38400
Parity = None
Stop Bits = 2
Data Bits = 8
Power Option = RTS
Elecraft K3S
Rig Name = Elecraft
Read Frequency Command = FA;
Read Mode Command = MD;
Convert To Hex = False
Baud Rate = 38400
Parity = None
Stop Bits = 1
Data Bits = 8
Power Option = RTS
Elecraft KX2
Rig Name = Elecraft
Read Frequency Command = FA
Read Mode Command = MD
Convert to Hex = False
Baud Rate= 38.4
Parity = None
Stop Bits= 2
Data Bits = 8
Power Option = RTS
Elecraft KX3
Rig Name = Elecraft
Read Frequency Command = FA
Read Mode Command = MD
Convert to Hex = False
Baud Rate= 4.8
Parity = None
Stop Bits= 2
Data Bits = 8
Power Option = RTS
FLdigi
Rig Name = Kenwood
Read Frequency Command = FA;
Read Mode Command = MD;
Convert To Hex = False
Baud Rate = 9600
Parity = None
Stop Bits = 2
Data Bits = 8
Power Option = RTS
Flex Radio (via API)
Rig Name = Flex API
Note, no other settings are required with the Flex API option. With this option, my software will track the active slice.
Flex Radio
Rig Name = FlexRadio
Read Frequency Command = FA;
Read Mode Command = MD;
Convert To Hex = False
Baud Rate = 4800
Parity = None
Stop Bits = 2
Data Bits = 8
Power Option = None
Icom 703
Rig Name = Icom
Read Frequency Command = FE FE 68 E0 03 FD
Read Mode Command = FE FE 68 E0 04 FD
Convert To Hex = True
Baud Rate = 19200
Parity = None
Stop Bits = 1
Data Bits = 8
Power Option = None
Icom 705
Read Frequency Command = FE FE A4 E0 03 FD
Read Mode Command = FE FE A4 E0 04 FD
Convert To Hex = True
Baud Rate = 56000
Parity = None
Stop Bits = 1
Data Bits = 8
Power Option = None
Icom 706
Rig Name = Icom
Read Frequency Command = FE FE 48 E0 03 FD
Read Mode Command = FE FE 48 E0 04 FD
Convert To Hex = True
Baud Rate = 1200
Parity = None
Stop Bits = 1
Data Bits = 8
Power Option = RTS
Icom 706 MK II
Rig Name = Icom
Read Frequency Command = FE FE 4E F0 03 FD
Read Mode Command = FE FE 4E E0 04 FD
Convert To Hex = True
Baud Rate = 19200
Parity = None
Stop Bits = 1
Data Bits = 8
Power Option = RTS
Icom 706 MK II G
Rig Name = Icom
Read Frequency Command = FE FE 58 F0 03 FD
Read Mode Command = FE FE 58 E0 04 FD
Convert To Hex = True
Baud Rate = 9600
Parity = None
Stop Bits = 1
Data Bits = 8
Power Option = RTS
Icom 718
Rig Name = Icom
Read Frequency Command = FE FE 5E E0 03 FD
Read Mode Command = FE FE 5E E0 04 FD
Convert To Hex = True
Baud Rate = 9600
Parity = None
Stop Bits = 1
Data Bits = 8
Power Option = RTS
Icom 728
Rig Name = Icom
Read Frequency Command = FE FE 5E E0 03 FD (another user said 38 was the correct rig ID)
Read Mode Command = FE FE 5E E0 04 FD
Convert To Hex = True
Baud Rate = 19200
Parity = None
Stop Bits = 1
Data Bits = 8
Power Option = DTR
Icom 735
Rig Name = Icom 735
Read Frequency Command = FE FE 04 E0 03 FD
Read Mode Command = FE FE 04 E0 04 FD
Convert To Hex = True
Baud Rate = 9600
Parity = None
Stop Bits = 1
Data Bits = 8
Power Option = None
Note – Icom 735 users report it is particularly important that you use the 9600 baud rate with this radio. You may have to adjust the radio’s baud rate by manually removing the cover and changing a jumper in the 735.
Icom 737
Rig Name = Icom
Read Frequency Command = FE FE 03 E0 03 FD
Read Mode Command = FE FE 03 E0 04 FD
Convert To Hex = True
Baud Rate = 9600
Parity = None
Stop Bits = 1
Data Bits = 8
Power Option = RTS
Icom 738
Rig Name = Icom
Read Frequency Command = FE FE 44 E0 03 FD
Read Mode Command = FE FE 44 E0 04 FD
Convert To Hex = True
Baud Rate = 9600
Parity = None
Stop Bits = 1
Data Bits = 8
Power Option = None
Icom 746 Pro
Rig Name = Icom
Read Frequency Command = FE FE 66 E0 03 FD
Read Mode Command = FE FE 66 E0 04 FD
Convert To Hex = True
Baud Rate = 19200
Parity = None
Stop Bits = 1
Data Bits = 8
Power Option = DTR
Icom 751A
Rig Name = Icom
Read Frequency Command = FE FE 1C E0 03 FD
Read Mode Command = FE FE 1C E0 04 FD
Convert To Hex = True
Baud Rate = 9600
Parity = None
Stop Bits = 1
Data Bits = 8
Power Option = RTS
Icom 756 Pro
Rig Name = Icom
Read Frequency Command = FE FE 5C E0 03 FD
Read Mode Command = FE FE 5C E0 04 FD
Convert To Hex = True
Baud Rate = 9600 (Note – one user reported success with baud rate of 1200)
Parity = None
Stop Bits = 1
Data Bits = 8
Power Option = RTS
Icom 756 Pro II
Rig Name = Icom
Read Frequency Command = FE FE 64 E0 03 FD
Read Mode Command = FE FE 64 E0 04 FD
Convert To Hex = True
Baud Rate = 1200
Parity = None
Stop Bits = 1
Data Bits = 8
Power Option = RTS
Icom 756 Pro III
Rig Name = Icom
Read Frequency Command = FE FE 6E E0 03 FD
Read Mode Command = FE FE 6E E0 04 FD
Convert To Hex = True
Baud Rate = 19200
Parity = None
Stop Bits = 1
Data Bits = 8
Power Option = None
Icom 765
Rig Name = Icom
Read Frequency Command = FE FE 2C E0 03 FD
Read Mode Command = FE FE 2C E0 04 FD
Convert To Hex = True
Baud Rate = 1200
Parity = None
Stop Bits = 1
Data Bits = 8
Power Option = None
Icom 775
Rig Name = Icom
Read Frequency Command = FE FE 46 E0 03 FD
Read Mode Command = FE FE 46 E0 04 FD
Convert To Hex = True
Baud Rate = 19200
Parity = None
Stop Bits = 1
Data Bits = 8
Power Option = None
Icom 821
Rig Name = Icom
Read Frequency Command = FE FE 4C E0 03 FD
Read Mode Command = FE FE 4C E0 04 FD
Convert To Hex = True
Baud Rate = 19200
Parity = None
Stop Bits = 1
Data Bits = 8
Power Option = RTS
Icom 7000
Rig Name = Icom
Read Frequency Command = FE FE 70 E0 03 FD
Read Mode Command = FE FE 70 E0 04 FD
Convert To Hex = True
Baud Rate = 19200
Parity = None
Stop Bits = 1
Data Bits = 8
Power Option = DTR
Icom 7100
Rig Name = Icom
Read Frequency Command = FE FE 88 E0 03 FD
Read Mode Command = FE FE 88 E0 04 FD
Convert To Hex = True
Baud Rate = 19200
Parity = None
Stop Bits = 1
Data Bits = 8
Power Option = RTS
Icom 7200
Rig Name = Icom
Read Frequency Command = FE FE 76 E0 03 FD
Read Mode Command = FE FE 76 E0 04 FD
Convert To Hex = True
Baud Rate = 19200
Parity = None
Stop Bits = 1
Data Bits = 8
Power Option = None
Icom 7300
Rig Name = Icom
Read Frequency Command = FE FE 94 E0 03 FD
Read Mode Command = FE FE 94 E0 04 FD
Convert To Hex = True
Baud Rate = 9600 (one user reported 56000, another reported 4800, but most reports have been 9600.)
Parity = None
Stop Bits = 1
Data Bits = 8
Power Option = None
Rob, KD9INB reports: « Had to turn the connection power to « Off » in the software setting AND also in the rig, and also had to set the CI-V port in the rig from »Unlinked » to « Linked ». Made sure the baud rate setting in the rig and software matched and viola! Works like a charm now. »
Icom 7410
Rig Name = Icom
Read Frequency Command = FE FE 80 E0 03 FD
Read Mode Command = FE FE 80 E0 04 FD
Note – another user wrote that his 7410 used 3F instead of 80
Convert To Hex = True
Baud Rate = 9600
Parity = None
Stop Bits = 1
Data Bits = 8
Power Option = RTS
Icom 7600
Rig Name = Icom
Read Frequency Command = FE FE 7A E0 03 FD
Read Mode Command = FE FE 7A E0 04 FD
Convert To Hex = True
Baud Rate = 9600
Parity = None
Stop Bits = 1
Data Bits = 8
Power Option = None
Icom 7610
Rig Name = Icom2
Read Frequency Command = FE FE 98 E0 03 FD
Read Mode Command = FE FE 98 E0 04 FD
Convert To Hex = True
Baud Rate = 38400
Parity = None
Stop Bits = 1
Data Bits = 8
Power Option = None
Icom 7700
Read Frequency Command = FE FE 74 E0 03 FD
Read Mode Command = FE FE 74 E0 04 FD
Convert To Hex = True
Baud Rate = 9600
Parity = None
Stop Bits = 1
Data Bits = 8
Power Option = RTS
Icom 7800
Rig Name = Icom
Read Frequency Command = FE FE 6A E0 03 FD
Read Mode Command = FE FE 6A E0 04 FD
Convert To Hex = True
Baud Rate = 9600
Parity = None
Stop Bits = 1
Data Bits = 8
Power Option = RTS
Icom 7851
Rig Name = Icom
Read Frequency Command = FE FE 8E E0 03 FD
Read Mode Command = FE FE 8E E0 04 FD
Convert To Hex = True
Baud Rate = 9600
Parity = None
Stop Bits = 1
Data Bits = 8
Power Option = RTS
David, WB4OZM notes: When one wants to use the USB cable instead of the 3.5mm plug in the remote outlet, I need the CV-V USB Echo Back in the « ON » position. After that all works very well! (Selecting Icom2 should remedy that.)
Icom 9100
Rig Name = Icom
Read Frequency Command = FE FE 7C E0 03 FD
Read Mode Command = FE FE 7C E0 04 FD
Convert To Hex = True
Baud Rate = 9600 (another user reported 19.2 worked for him)
Parity = None
Stop Bits = 1
Data Bits = 8
Power Option = RTS
Icom 9700
Rig Name = Icom2
Read Frequency Command = FE FE A2 E0 03 FD
Read Mode Command = FE FE A2 E0 04 FD
Convert To Hex = True
Baud Rate = 19200
Parity = None
Stop Bits = 1
Data Bits = 8
Power Option = RTS
Note – Kenwood rigs have two options and most will work with either selection, though I recommend Kenwood2. The settings listed below are the ones users just happened to send in. The first setting, Kenwood, always reads the VFO specified (FA; reads VFO A and FB; reads VFO B). Kenwood2 always reads the active VFO. Kenwood2 also sometimes returns a mode when the first setting does not.
Kenwood TS 440s
Rig Name = Kenwood2
Read Frequency Command = IF;
Read Mode Command =
Convert To Hex = False
Baud Rate = 4800
Parity = None
Stop Bits = 2
Data Bits = 8
Power Option = RTS
Kenwood TS 480HX
Rig Name = Kenwood
Read Frequency Command = FA;
Read Mode Command = MD;
Convert To Hex = False
Baud Rate = 9600
Parity = None
Stop Bits = 1
Data Bits = 8
Power Option = RTS
Kenwood TS 570
Rig Name = Kenwood2
Read Frequency Command = IF;
Read Mode Command =
Convert To Hex = False
Baud Rate = 9600
Parity = None
Stop Bits = 1
Data Bits = 8
Power Option = RTS
Kenwood TS 590
Rig Name = Kenwood2
Read Frequency Command = IF;
Read Mode Command =
Convert To Hex = False
Baud Rate = 9600 (some users report 115200)
Parity = None
Stop Bits = 1
Data Bits = 8
Power Option = RTS
Please note that for the Kenwoood 590, users have reported it is necessary to change the rig’s default baud rate as one user detailed here on the Users group. In short, he writes « I now set everything to 38.4 – the 2 menu settings that I didn’t know existed (61 and 62) as well as the device manager for the bridge and the software, and waalaa! It works like advertised! » That said, another 590 user reported that his 590 worked fine at 9600 baud. Also, you can enter any baud rate you like by clicking the Other button.
Kenwood TS 870
Read Frequency Command = FA;
Read Mode Command = MD;
Convert To Hex = False
Baud Rate = 9600
Parity = None
Stop Bits = 1
Data Bits = 8
Power Option = RTS
Kenwood TS 990
Rig Name = Kenwood2
Read Frequency Command = IF;
Read Mode Command =
Convert To Hex = False
Baud Rate = 115,200 (Click Other Button)
Parity = None
Stop Bits = 1
Data Bits = 8
Power Option = RTS
Kenwood TS 2000
Rig Name = Kenwood2
Read Frequency Command = IF;
Read Mode Command =
Convert To Hex = False
Baud Rate = 9600
Parity = None
Stop Bits = 2
Data Bits = 8
Power Option = RTS
Ten Tec Jupiter
Rig Name = Ten Tec Fnt Pnl
Read Frequency Command = 3F 41 0D
Read Mode Command = 3F 4D 0D
Convert To Hex = True
Baud Rate = 56000 (Another user reported 57600)
Parity = None
Stop Bits = 1
Data Bits = 8
Power Option = RTS (Another user reported Both)
Ten Tec Omni VI
Rig Name = Ten Tec Omni VI
Read Frequency Command = FE FE 04 E0 03 FD
Read Mode Command = FE FE 04 E0 04 FD
Convert To Hex = True
Baud Rate = 19200
Parity = None
Stop Bits = 1
Data Bits = 8
Power Option = RTS
Ten Tec Omni VII
Rig Name = Ten Tec Omni VII
Read Frequency Command = ?A
Read Mode Command = ?M
Convert To Hex = True
Baud Rate = 56000
Parity = None
Stop Bits = 1
Data Bits = 8
Power Option = RTS
Ten Tec Orion I
Rig Name = Ten Tec Orion
Read Frequency Command = ?AF
Read Mode Command = ?RMM
Convert To Hex = False
Baud Rate = 56000
Parity = None
Stop Bits = 1
Data Bits = 8
Power Option = RTS
Ten Tec Orion II
Rig Name = Ten Tec Orion
Read Frequency Command = ?AF
Read Mode Command = ?RMM
Convert To Hex = False
Baud Rate = 56000
Parity = None
Stop Bits = 1
Data Bits = 8
Power Option = RTS
Xiegu X5105
Rig Name = Icom
Read Frequency Command = FE FE 70 E0 03 FD
Read Mode Command = FE FE 70 E0 04 FD
Convert To Hex = True
Baud Rate = 19200
Parity = None
Stop Bits = 1
Data Bits = 8
Power Option = DTR
Yaesu 100D
Rig Name = Yaesu 100D
Read Frequency Command = 00 00 00 02 10
Read Mode Command =
Convert To Hex = True
Baud Rate = 19200
Parity = None
Stop Bits = 2
Data Bits = 8
Power Option = None
Yaesu 100MP
Rig Name = Yaesu 991 (That’s correct, please use the 991 selection)
Read Frequency Command = FA;
Read Mode Command = MD0;
Convert To Hex = False
Baud Rate = 4800
Parity = None
Stop Bits = 2
Data Bits = 8
Power Option = Both
Yaesu 101D
Rig Name = Yaesu Newer 2
Read Frequency Command = FA;
Read Mode Command = MD0;
Convert To Hex = False
Baud Rate = 9600
Parity = None
Stop Bits = 2
Data Bits = 8
Power Option = RTS
Yaesu 101MP
Rig Name = Yaesu Newer 2
Read Frequency Command = FA;
Read Mode Command = MD0;
Convert To Hex = False
Baud Rate = 38400
Parity = None
Stop Bits = 2
Data Bits = 8
Power Option = RTS
Yaesu 450D
Rig Name = Yaesu – Newer
Read Frequency Command = FA;
Read Mode Command = MD0;
Convert To Hex = False
Baud Rate = 38400
Parity = None
Stop Bits = 2
Data Bits = 8
Power Option = RTS
Yaesu 817
Rig Name = Yaesu – Older
Read Frequency Command = 00 00 00 00 03
Read Mode Command =
Convert To Hex = True
Baud Rate = 38400
Parity = None
Stop Bits = 2
Data Bits = 8
Power Option = RTS
Yaesu 847
Note – Some, but not all Yaesu 847 users were having trouble interfacing with the new, C#.NET versions of my software. This problem has been corrected in rig interface verion 1.3 and later by sending a command to start cat control when the port is opened if Yaesu – Older is selected. Your 847 must first be turned on before starting rig interface with the software.
Rig Name = Yaesu – Older
Read Frequency Command = 00 00 00 00 03
Read Mode Command =
Convert To Hex = True
Baud Rate = 9600
Parity = None
Stop Bits = 2
Data Bits = 8
Power Option = RTS
Yaesu 857
Rig Name = Yaesu – Older
Read Frequency Command = 00 00 00 00 03
Read Mode Command =
Convert To Hex = True
Baud Rate = 4800
Parity = None
Stop Bits = 2
Data Bits = 8
Power Option = RTS
Yaesu 890
Rig Name = Yaesu 890
Read Frequency Command = 00 00 00 02 10
Read Mode Command =
Convert To Hex = True
Baud Rate = 4800
Parity = None
Stop Bits = 2
Data Bits = 8
Power Option = RTS
Yaesu 891
Rig Name = Yaesu 891
Read Frequency Command = FA;
Read Mode Command = MD0;
Convert To Hex = False
Baud Rate = 9600
Parity = None
Stop Bits = 2 (some users report 1)
Data Bits = 8
Power Option = RTS
Additional SSB / CW memory CAT commands courtesy Ray, W8RD: http://w8rd.net/FT-891/ACLog%20extended%20rig%20control.pdf
Yaesu 897
Rig Name = Yaesu – Older
Read Frequency Command = 00 00 00 00 03
Read Mode Command =
Convert To Hex = True
Baud Rate = 4800
Parity = None
Stop Bits = 2
Data Bits = 8
Power Option = RTS
Yaesu 900
Rig Name = Yaesu 900
Read Frequency Command = 00 00 00 02 10
Read Mode Command =
Convert To Hex = True
Baud Rate = 4800
Parity = None
Stop Bits = 1
Data Bits = 8
Power Option = RTS
Yaesu 920
Rig Name = Yaesu 920
Read Frequency Command = 00 00 00 02 10
Read Mode Command =
Convert To Hex = True
Baud Rate = 4800
Parity = None
Stop Bits = 2
Data Bits = 8
Power Option = RTS
Yaesu 950
Rig Name = Yaesu – Newer
Read Frequency Command = FA;
Read Mode Command = MD0;
Convert To Hex = False
Baud Rate = 4800
Parity = None
Stop Bits = 2
Data Bits = 8
Power Option = RTS
Yaesu 991
Rig Name = Yaesu Newer 2
Read Frequency Command = FA;
Read Mode Command = MD0;
Convert To Hex = False
Baud Rate = 9600
Parity = None
Stop Bits = 2
Data Bits = 8
Power Option = RTS
Yaesu 1000
Rig Name = Yaesu 1000
Read Frequency Command = 00 00 00 02 10
Read Mode Command =
Convert To Hex = True
Baud Rate = 4800
Parity = None
Stop Bits = 2
Data Bits = 8
Power Option = RTS
Yaesu 1000 D
Rig Name = Yaesu 1000 D
Read Frequency Command = 00 00 00 02 10
Read Mode Command =
Convert To Hex = True
Baud Rate = 4800
Parity = None
Stop Bits = 2
Data Bits = 8
Power Option = RTS
Yaesu 1000 MP
Rig Name = Yaesu 1000
Read Frequency Command = 00 00 00 02 10
Read Mode Command =
Convert To Hex = True
Baud Rate = 4800
Parity = None
Stop Bits = 2
Data Bits = 8
Power Option = RTS
Yaesu 1200
Rig Name = Yaesu – Newer
Read Frequency Command = FA;
Read Mode Command = MD0;
Convert To Hex = False
Baud Rate = 38400 (some users report 4800 also works)
Parity = None
Stop Bits = 2
Data Bits = 8
Power Option = RTS
Yaesu 2000
Rig Name = Yaesu – Newer
Read Frequency Command = FA;
Read Mode Command = MD0;
Convert To Hex = False
Baud Rate = 38400
Parity = None
Stop Bits = 2
Data Bits = 8
Power Option = RTS
Yaesu 3000
Rig Name = Yaesu – Newer
Read Frequency Command = FA;
Read Mode Command = MD0;
Convert To Hex = False
Baud Rate = 38400
Parity = None
Stop Bits = 2
Data Bits = 8
Power Option = RTS
A user reported the following codes can be used in the phone F key set up form for firing the Yaesu 3000 rig voice memories:
RI:PB01;
RI:PB02;
RI:PB03;
RI:PB04;
RI:PB05;
Yaesu 5000
Rig Name = Yaesu – Newer
Read Frequency Command = FA;
Read Mode Command = MD0;
Convert To Hex = False
Baud Rate = 38400
Parity = None
Stop Bits = 2
Data Bits = 8
Power Option = RTS
Yaesu 9000
Rig Name = Yaesu – Newer
Read Frequency Command = FA;
Read Mode Command = MD0;
Convert To Hex = False
Baud Rate = 19200
Parity = None
Stop Bits = 2
Data Bits = 8
Power Option = RTS
Yaesu Mark V
Rig Name = Yaesu 1000
Read Frequency Command = 00 00 00 02 10
Read Mode Command =
Convert To Hex = True
Baud Rate = 4800
Parity = None
Stop Bits = 2
Data Bits = 8
Power Option = RTS